Pop Up Cube and Cover

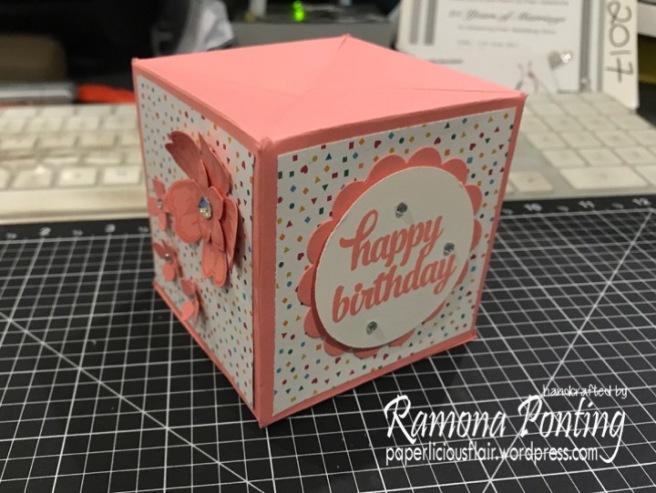
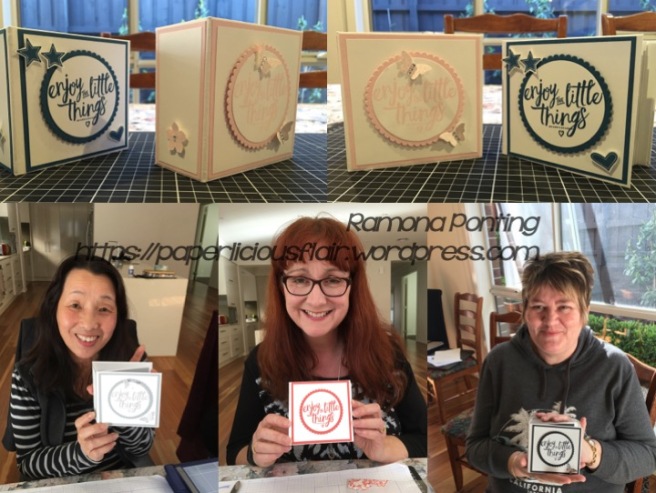
Here is a fabulous project that makes a great 3D gift card for someone special. Special thanks to Keran Howell from Tuppence Coloured for inspiring me to make this and showing me how it’s done. The pop-up cube is a 3″ cube and the cover for the cube is 6″ x 3 1/8″ x 1/8″.

As Stampin’ Up! gets ready to release it’s new Annual Catalogue in June this year, we say goodbye to many retiring products. So what a great opportunity to use some of those retiring items in my project today.

If you would like to see what items will be retiring from the Annual Catalogue and the Occasions Catalogue, click on this link.

April 2017 Crafternoon Class - Slide11


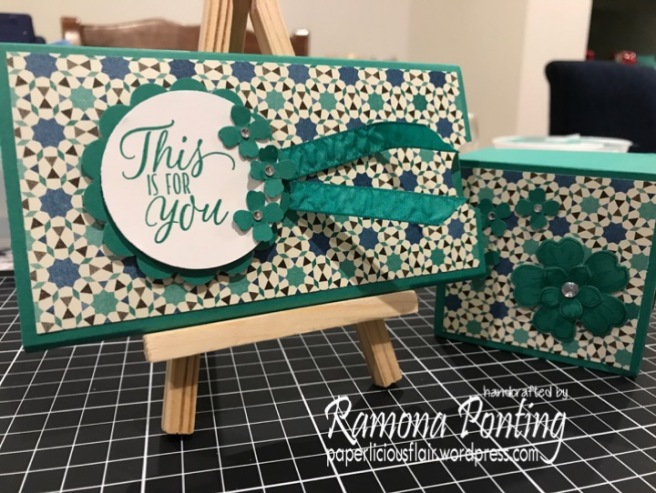
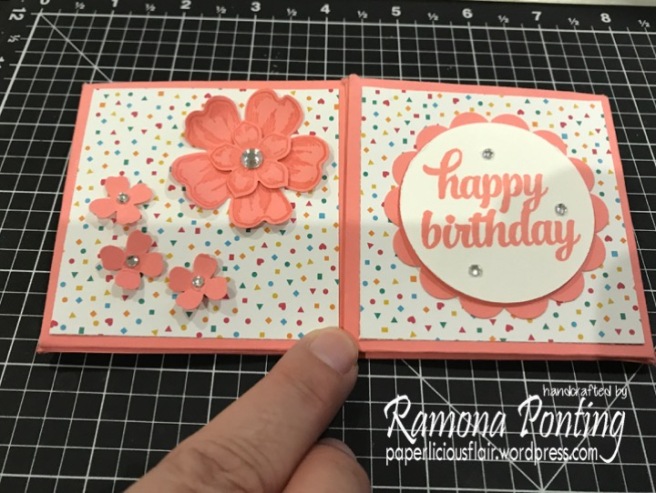
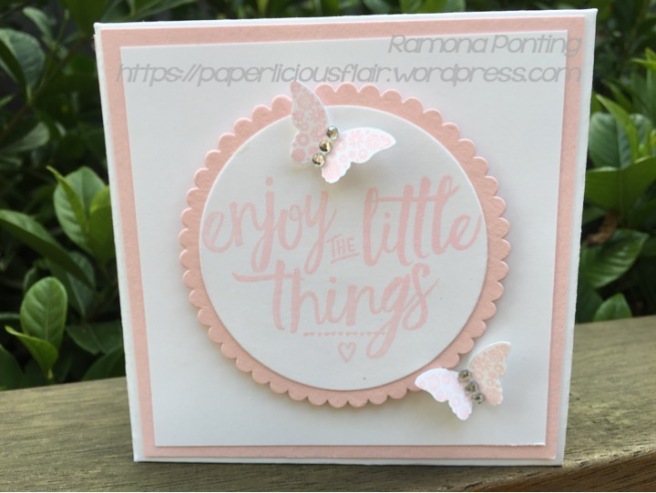
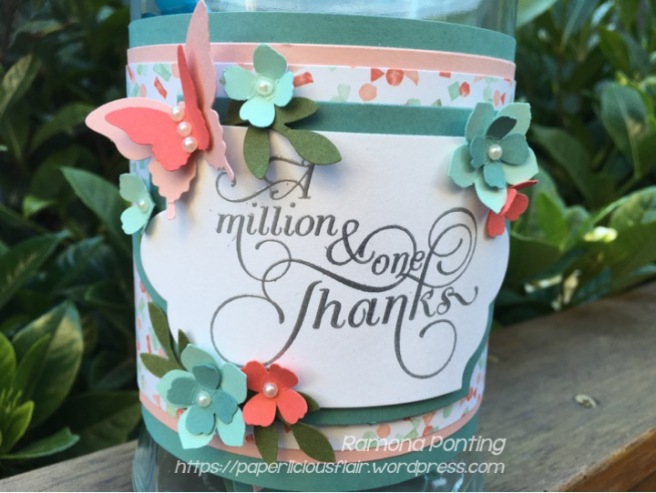
The above example uses Emerald Envy as the base colour and the patterned paper is from the Moroccan Designer Series Paper pack.

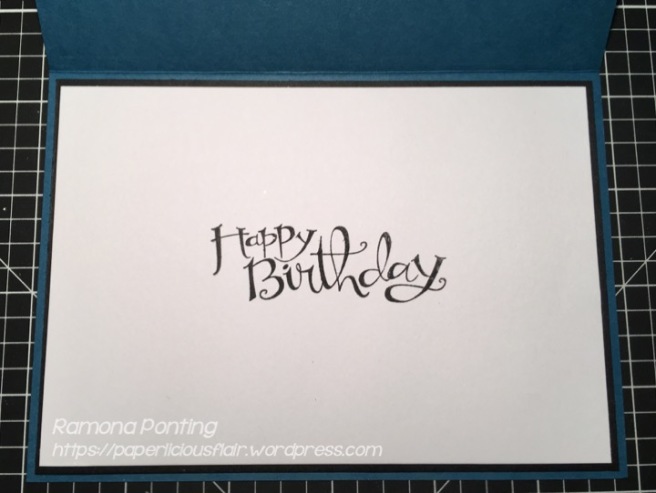
The sentiment above is from the stamp set ‘Tin of Tags” and the sentiment used on the Pop Up Cube comes from the stamp set “Tin of Cards”.

I love punches and have collected many of the Stampin’ Up range over the years. This project uses the following punches:
– 2 3/8″ Scallop Circle punch
– 2″ Circle punch
– Pansy punch
– Petite Petals punch
– small flower from the Itty Bitty Accent Punches set (retired)
– 1/8″ hole punch (retired)

Embellishments for this project are:
– ruched ribbon in Emerald Envy
– Stampin’ Up! Rhinestone Basic Jewels

I created my own templates – a little different to Helen’s, that made it easier for me to create my cube. I won’t share that here out of respect for Helen. But I found I needed to flip the design of one of her pieces of cardstock to ensure the score lines were for both pieces of card were on the right side of the cardstock. (This will make more sense if you make one).


I love this project as it’s a great way to use up leftover DSP and there are so many different designs that you can do. What a great 18th, 21st, 100th cube it would make.

Hope you are inspired to make one yourself! Go for it – it’s lots of fun and produces a satisfying result.

April 2017 Crafternoon Class - Slide02

April 2017 Crafternoon Class - Slide01

Mini Albums

wm-mini-album-slide1

This beautiful mini album was inspired by Helen Griffin. I decided to make myself a mini album for each of my children, where I would put photos from their early years to now – purely for me to enjoy and have displayed in my creative space to look at whenever I choose.

Helen kindly shared the measurements with everyone on her blog, but to cater to the A4 paper that we have in Australia, I have made some amendments to her original measurements AND included metric measurements as well as imperial.

To see a video showing you how to put this together, watch the following YouTube link: https://www.youtube.com/watch?v=kGW4aUvfwBg


MATERIALS:

  • 4 x A4 sheets of Whisper White (regular stock, not thick)
  • 3 x A4 sheets of a contrasting cardstock colour
  • Chipboard or really thick cardboard
  • Tombow Multipurpose Liquid Glue
  • Tear and Tape Adhesive double-sided tape
  • Bone Folder
  • Dimensionals
  • Mini Glue Dots
  • Bitty Butterfly Punch
  • Petite Flower Punch
  • Layering Circle Framelits
  • Matching ink
  • Stamp Sets: Layering Love, Petite Petals, Papillon Potpourri
  • Rhinestones

MEASUREMENTS:

INSIDE PAGES
Imperial Metric Number of pieces Colour
4” x 8¼” 10.2cm x 20.1cm 1 Whisper White
4” x 9” 10.2cm x 22.8cm 1 Whisper White
4” x 9¾” 10.2cm x 24.8cm 1 Whisper White

Along the long edge, score @ 4”/10.2cm, turn 180° and score again at 4”/10.2cm.
Do this on all three strips of card.
Please note: each of the above strips are the same height but different lengths. When you do the following scoring, you will end up with different spine widths.

COVER (made out of chipboard or really thick card)
Imperial Metric Number of pieces Colour
4¼” x 4¼” 10.8cm x 10.8cm 2
4¼” x 2” 10.8cm x 5.1cm 1


COVER PAPER (Outside and Inside)
Imperial Metric Number of pieces Colour
5” x 11¾” 12.7cm x 29.5cm 1 Whisper White
4” x 10½” 10.2cm x 26.1cm 1 Whisper White


COVER MATS
Imperial Metric Number of pieces Colour
4 1/8” x 4 1/8” 10.5cm x 10.5cm 2 Contrasting colour
3 7/8” x 3 7/8” 9.8cm x 9.8cm 2 Whisper White
4 1/8” x 1 7/8” 10.5cm x 4.8cm 1 Contrasting colour
3 7/8” x 1 9/16” 9.8cm x 4cm 1 Whisper White


PAGE MATS
Imperial Metric Number of pieces Colour
3¾” x 3¾” 9.5cm x 9.5cm 12 Contrasting colour

sept-crafternoon-class-1


Cascade Birthday Card

I enjoyed the challenge of making this card – it certainly had me thinking outside the box when putting it together. I started with my prototype, using old cardstock to see if I could make it work for me. The result is below:

My inspiration for this card came from several ideas from Pinterest and YouTube. To learn how to make the card, I followed a clip by France Martin and then had fun decorating it myself.

In my latest Crafternoon session with my customers, we recreated the card above, using Stampin’ Up products, and this is what they produced:


One of our neighbours has recently given birth to a little girl. So I decided to have a go at making a cascade baby card to go with a little gift. Inspired by Lolascarp et compagnie, I had fun trying to replicate her card, using the stamps and papers that I had at hand. This is what I came up with:

If you’ve never made a cascade card before, go to the following link by France Martin where you will learn how to put one together very quickly and easily. Then go ahead and decorate your card however you like, for whatever occasion you wish.

If you don’t have 12″x12″ paper, you can make a smaller card, using  2 sheets of A4 paper. Dimensions and how-to are shown in the following link from Dawn’s Stamping Thoughts.

I hope you have as much fun as I did when I first made mine!
Happy Crafting!

Puffed Balloon Birthday Card

WM PUFFY BALLOON CARD MAY 2016 Slide 2WM PUFFY BALLOON CARD MAY 2016 Slide2

Children’s birthday cards are a lot of fun to make – particularly because the chosen colours are often bright and vibrant. I have cased this card from Dawn Griffith who has a video showing you how to achieve the puffy balloons on this card.

For my card, I chose to mix some retiring, current and upcoming new Stampin’ Up products.

The featured colours in this card are the new Stampin’ Up in-colours for 2016-2018:

  • Peekaboo Peach
  • Dapper Denim – I used this colour for the card base as well as a balloon.
  • Emerald Envy
  • Sweet Sugarplum and
  • Flirty Flamingo – all which will be available for purchase on 1st June, 2016.

The retiring products I have chosen to feature are:

  •  the Sassy Salutations Stamp Set (the inside ‘Happy Birthday’ sentiment);  and
  • the Little Letters Thinlits (for the H A P P Y letters on the balloons on the front of the card).

The current products used are:

  • the Number of Years Stamp Set
  • the matching Large Numbers framelits (both this and the above stamp set are available for 15% off as a bundle before May 31, 2016 – after this, they will sell separately at full price).

Other products used were: basic black ink, multipurpose liquid glue, Snail adhesive, dimensionals, white bakers twine, whisper white cardstock, basic black cardstock and dazzling diamonds glimmer paper.

Below are some examples of cards made by my customers.


A Jar of Thanks

WM Jar Of Thanks (5)

What a lovely group of colours is featured in the Birthday Bouquet Designer Series Paper pack – Lost Lagoon, Blushing Bride, Pool Party, Watermelon Wonder. As an added colour, I chose Mossy Meadow for my leaves.

This project was presented to me in a class run by Judy May. Judy is an incredibly talented lady who came up with this design for one of her classes. She used the Botanical Builder Framelit Dies to decorate the front of her jar.

I had such a wonderful time decorate the jar and learning how to make a little matching clipboard style notebook, which holds 7cm x 9.9cm pieces of paper, all cut down from A4 copy paper and held together by a very cute, small bulldog clip. The idea of the jar is to write notes of things you are thankful for throughout the year, then to put them into the jar to save for reading at the end of the year.

The ladies and gentleman (I had one) in my April class loved making this project and completed some beautiful work, worthy of keeping or gifting to someone special.

The following Stampin Up! items were used to create this project:


Punch Art Easter Bunny

Punch Art is something I really enjoy doing, as do those who attend my classes. So, for Easter this year, we had some fun creating this cute bunny.

Inspired by Laurie Zoellmer, I made a few alterations to my card and am pleased with the result.

The very first card I made was in Blushing Bride – it turned out to be a beautiful card for the birth of a baby girl. The one pictured here in in Melon Mambo. Why not have a try at making your own with your own colour of choice. The shapes for the bunny were created using the following punches/framelits:

Face: XLarge Oval Punch x1
Feet: Large Oval Punch x2
Small oval framelits (Sizzix set) in DSP x2
Ears: Large Oval Punch x2
Small oval framelits (Sizzix set) x2
Small oval framelits (Sizzix set) in DSP x2
Cheeks: 3/4″ Circle Punch x2
Arms: Modern Label Punch (retired) x1, cut in half
Nose: Heart from the Owl Builder Punch x1
Eyes: 1/8″ Hole Punch x2
Mouth: Itty Bitty Punch Pack circle (retired) x1
Tail: 1 x Itty Bitty Punch Pack flower (retired) x1
Corners of the background were created using the Curvy Corner Trio Punch.


Punch Art Bunny (1)
Easter Bunny in Melon Mambo.
Punch Art Bunny (2)
Sentiment from the ‘For Peeps Sake’ stamp set.
Punch Art Bunny (3)
Beautiful corner boarders created with the ‘Curvy Corner Trio Punch’.

Work of Art Easter Egg Card

Easter is a time where I join with many others to remember the death of Jesus Christ on the cross, and to celebrate His resurrection three days later. Seeing the egg as a symbol of new life, I enjoyed creating this card, as inspired by Tami White. Using the stamps and punches that I had on hand, I was able to create my own version of her card. I love the way this card uses the incredibly versatile Work of Art stamp set and colours from the Subtles Inks range. Featured punches are: Itty Bitty Accents Punch Pack – flower, Petite Petals Punch, the Bird Builder Punch for the leaves, and the retired Curly Label punch for the sentiment.

The oval frame was created using the Ovals Collection Framelits Dies.

The stamp set.’For Peeps Sake’, is retired.

Colours featured in this card are:

Flowerpot Card

I have an amazing up-up-line! She is one of the most creative people I know, and her eye for detail is faultless. At a class I attended last year, Judy May taught me how to make an adorable flowerpot card which I have not had the heart to give away yet as it is too lovely to part with!

I have taken Judy’s flowerpot and flowers and added it to a card base – it is all Judy’s idea, but made simpler by sticking it onto a card.

Thanks, Judy for your inspiration. Go and check out the other amazing projects Judy has created here for more inspiration!

Flowerpot Card WM - Slide2Flowerpot Card WM - Slide3Flowerpot Card WM - Slide1

For this project, I used the following:

Flower Shop Stamp Bundle
Itty Bitty Accents Punch Pack
– Decorative Label Punch (retired)
– Small Over Punch (retired) – for leaves
Very Vanilla Cardstock
Cajun Craze Cardstock
Garden Green Cardstock
Tempting Turquoise Cardstock or Watermelon Wonder Cardstock
Chocolate Chip Ink
Blushing Bride Ink
Rich Razzleberry Ink
Tangelo Twist Ink
Hello Honey Ink
Tempting Turquoise Ink

Punch Art Dog

This is the most adorable card I have made in a long while. Thanks to the inspiration by Julie Kettlewell I created my own, simpler version of this card and used sentiments from the Party Wishes stamp set.

It’s a great idea to pull out your punches and to see what you can create using the various shapes on offer. Thanks to Julie, here is an example of such.

Punches used for the above project are:

Extra Large Oval – for head and body
– Small Oval (retired) – for back paws and nose
Owl Builder Punch – eyes
Bird Builder Punch – for tail and ears
Word Window Punch  – for legs and neck
3/4″ Circle Punch – for front paws
– Flower from Itty Bitty Punches (retired) – for hair on head
Party Wishes Stamp Set
Soft Suede Ink
Chocolate Chip Ink
Whisper White Card


Sweetheart Card

Valentine’s Day is drawing near, so at my recent 2016 January Crafternoon Class, I decided we would all make a Valentine’s Day card. This card idea was CASEd from Tina Rappe from her ‘Stampin’ Studio’ blog. Thanks, Tina, for the inspiration!

Slide3

The card base measures 5 1/2″ x  5 1/2″, and the Whisper White mat is 5″ x5″. As the Happy Heart Textured embossing folder measures 4 1/2″ x 6 3/16″, it has been embossed to the right hand side of the white mat, leaving a smooth strip to the left – perfect for a piece of ribbon.

I decided to add extra Real Red cardstock hearts, punched out with the heart punch from the Itty Bitty Accents Punch pack. The larger hearts were made using the Sweetheart Punch, in Basic Black cardstock, Real Red cardstock and Silver Glimmer Paper. The red hearts were embellished with Stampin Up! rhinestones.

Slide4

On the inside of the card, I used another Whisper White mat, measuring 5″ x5″. I have just purchased the Confetti Hearts Border Punch, so used this to create the top border, then added three more of the Itty Bitty Accent Punch hearts.

For a sentiment, you can add whatever you like to the front of this card. I chose LOVE YOU for Valentine’s Day, but also made one with CONGRATULATIONS on the front, for an upcoming Engagement Party I am attending.

Slide5

I hope this card inspires you to create your own Valentine’s Day card for Feb 14!

Happy crafting!